- Table of Contents
- Quick Summary
- Step 1: Assess the Condition of Your Body Armor
- Step 2: Follow Manufacturer Guidelines for Defective Armor
- Step 3: Document Any Defects for Warranty Claims
- Step 4: Dispose of Defective Armor Safely
- Step 5: Replace with Certified Body Armor
- Upgrade Your Protection with Trusted Armor Solutions
- Frequently Asked Questions
- Recommended
Body armor is designed to shield you when it matters most. Yet even the best vest can fail without warning and become defective body armor. Just one tiny tear or hidden patch of moisture can ruin its protective power and leave you exposed. Most people assume a quick glance tells the whole story. The truth is, real safety starts with a closer look—one that separates safe from sorry.
Table of Contents
- Step 1: Assess The Condition Of Your Body Armor
- Step 2: Follow Manufacturer Guidelines For Defective Armor
- Step 3: Document Any Defects For Warranty Claims
- Step 4: Dispose Of Defective Armor Safely
- Step 5: Replace With Certified Body Armor
Quick Summary
| Key Point | Explanation |
|---|---|
| 1. Regularly assess body armor condition | Conduct thorough inspections for wear, damage, and material integrity. Look for tears, discoloration, and areas of stress on the armor. |
| 2. Follow manufacturer guidelines for defects | Contact the manufacturer immediately if defects are found. Document issues and request replacement or inspection protocol for safety. |
| 3. Document all defects for warranty claims | Use high-resolution photos and detailed written reports of defects. Organize receipts and warranties to support your claim for replacements. |
| 4. Safely dispose of defective armor | Destroy compromised armor completely to prevent misuse and comply with safety protocols. Cut through critical components to ensure it’s unrecognizable. |
| 5. Replace with NIJ-certified body armor | Choose new armor based on certified levels appropriate for your needs. Confirm all documentation and specifications before making a purchase. |
Step 1: Assess the Condition of Your Body Armor
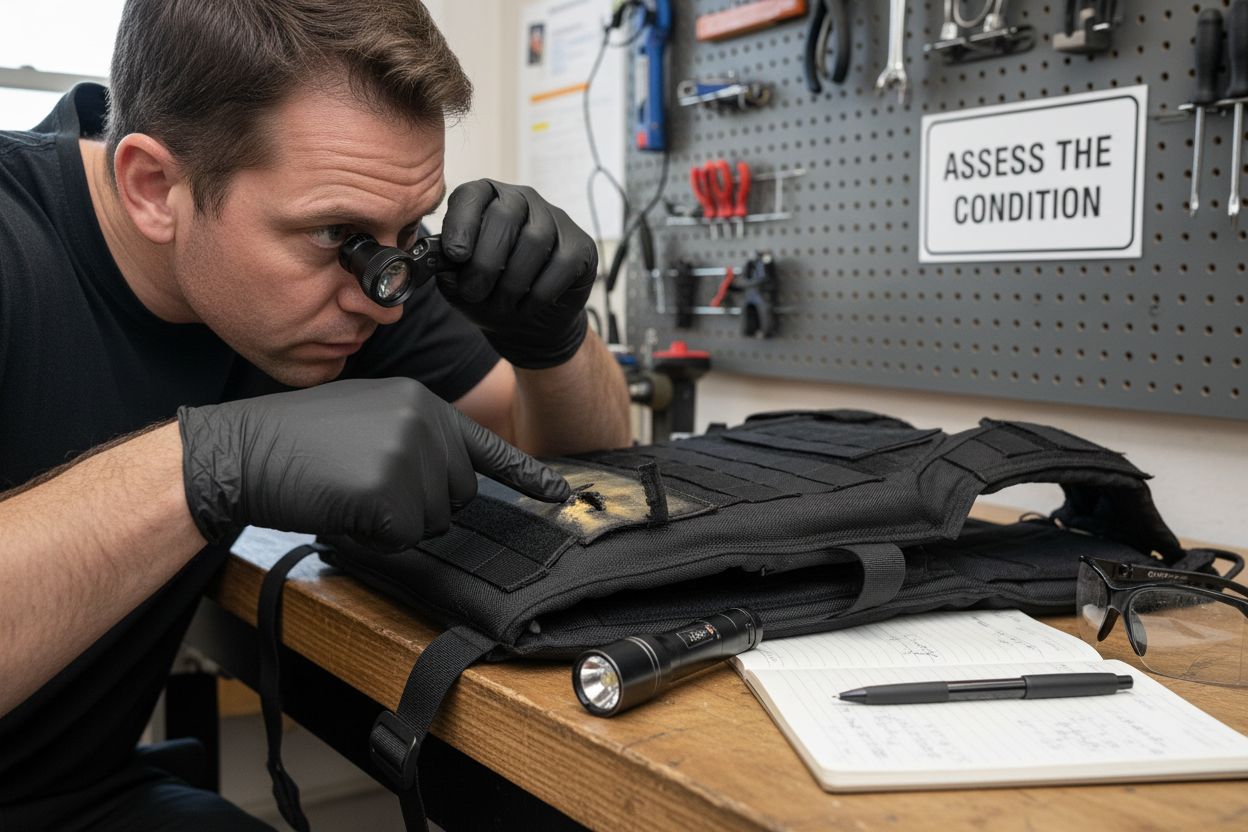
Evaluating the condition of your body armor is a critical first step in ensuring your personal safety and maintaining protective equipment integrity. Unlike routine gear maintenance, body armor assessment requires meticulous attention to detail and a systematic approach that goes beyond superficial visual inspection.
Begin by carefully removing the vest from storage and conducting a comprehensive physical examination. Look for subtle signs of wear or damage that might compromise its ballistic protection capabilities. Check for discoloration, fraying, tears, or unusual fabric deformation – even minor imperfections can significantly reduce the armor’s protective performance. Pay special attention to areas experiencing frequent stress or movement, such as side panels, shoulder regions, and connection points.
Moisture and environmental exposure are silent enemies of body armor materials. Inspect for any water stains, mold, mildew, or signs of chemical degradation that could weaken the protective fibers. These indicators suggest potential structural compromise, especially in vests containing sensitive materials like Zylon. Rotate the vest under good lighting, examining both exterior and interior surfaces carefully.
For those seeking more comprehensive guidance, read our detailed body armor inspection guide to understand nuanced evaluation techniques. Tactile examination is equally important as visual assessment. Gently run your hands across the surface, feeling for any irregularities, hard spots, or areas of uneven density that might indicate internal damage.
Critical verification criteria include:
- No visible tears or significant fabric deterioration
- Consistent material density without hard or soft spots
- No discoloration beyond normal wear
- Intact fastening mechanisms and secure attachment points
- No evidence of moisture damage or chemical exposure
Remember that professional body armor manufacturers often recommend periodic professional inspections. If you detect any concerning signs during your assessment, consult the manufacturer or a certified body armor technician for a comprehensive evaluation. Your safety depends on the reliable performance of this critical protective equipment.
Below is a checklist table summarizing key verification points when assessing the condition of your body armor. Use this table to ensure your vest meets all safety and performance criteria before continued use.
| Verification Item | What to Look For | Pass/Fail |
|---|---|---|
| Fabric Integrity | No visible tears, fraying, or major wear | |
| Material Density | Consistent texture; no hard/soft spots | |
| Discoloration | No unusual color changes beyond normal wear | |
| Fastening Mechanisms | All attachment points secure and functional | |
| Moisture/Chemical Damage | No water stains, mold, mildew, or residue | |
| Label & Certification Tags | Present and legible on the armor | |
| Overall Cleanliness | No buildup of dirt, oil, or foreign material |
Step 2: Follow Manufacturer Guidelines for Defective Armor
Navigating manufacturer guidelines for defective body armor requires a strategic and systematic approach. Each manufacturer has specific protocols for handling compromised protective equipment, and understanding these procedures is crucial for maintaining your safety and preserving potential warranty or replacement options.
Contact the manufacturer immediately after identifying potential defects in your body armor. Prepare comprehensive documentation including the vest’s serial number, date of purchase, and detailed description of observed issues. Most manufacturers maintain dedicated customer service channels specifically designed for equipment assessment and potential replacement. Learn more about taking responsibility for your safety when dealing with potentially compromised protective gear.
Initiate communication through multiple channels – telephone, email, and official website contact forms. Request a formal inspection or replacement protocol, ensuring you have written documentation of every interaction. Many manufacturers require specific submission processes, which might include:
- Completing an official defect report form
- Providing photographic evidence of damage
- Submitting original purchase documentation
- Shipping the vest to a designated inspection center
Be prepared for potential scenarios where manufacturers may request the physical vest for direct examination. Carefully package the armor following their specific instructions, typically requiring protective wrapping to prevent additional damage during transit.
Use trackable shipping methods and retain all shipping receipts as proof of submission.

Understand that different manufacturers have varying replacement policies. Some might offer immediate replacement, while others conduct extensive testing before determining the appropriate response. Professional law enforcement and military personnel should prioritize urgent replacement, given the critical nature of body armor in high-risk environments.
Verify the manufacturer’s specific timeline for response and potential replacement. Follow up persistently if you do not receive a timely communication, documenting all attempts at contact. Your proactive approach demonstrates responsible equipment management and ensures you are not left vulnerable due to administrative delays.
Remember that manufacturer guidelines are designed to protect both the user and the company. By meticulously following their established procedures, you maximize your chances of receiving a proper replacement or resolution for your defective body armor.
Step 3: Document Any Defects for Warranty Claims
Documenting body armor defects requires precision and thoroughness to ensure successful warranty claims and potential replacements. This critical step transforms your observations into actionable evidence that can protect both your safety and financial investment.
Professional documentation begins with comprehensive visual evidence. Utilize a high-resolution digital camera or smartphone to capture clear, well-lit photographs documenting every aspect of the defective armor. Focus on creating images that showcase specific damage areas, including close-up shots that reveal material degradation, structural weakening, or unusual wear patterns. Ensure each photograph includes a reference scale or measurement tool to provide context and professional credibility.
Create a detailed written report accompanying your visual documentation. Explore our preparedness guide for comprehensive safety documentation to understand systematic reporting techniques. Your written report should include:
- Precise date of initial armor purchase
- Complete serial number and model information
- Detailed description of observed defects
- Potential dates and circumstances of damage detection
- Environmental conditions the armor has been exposed to
Organize all supporting documentation systematically. This includes original purchase receipts, manufacturer warranties, maintenance records, and any previous correspondence regarding the body armor. Chronological organization demonstrates professionalism and increases the likelihood of a successful warranty claim.
Photograph the manufacturer’s labels and tags, ensuring clear visibility of critical information like production date, material specifications, and certification standards. These details can be crucial when manufacturers assess warranty eligibility. Pay particular attention to preserving original packaging and tags, as these might contain additional information supporting your claim.
Be prepared for potential requests from manufacturers requiring additional information or physical armor inspection. Maintain copies of all documentation and photographic evidence, storing digital files in multiple secure locations. Consider creating both physical and digital backup archives to prevent potential loss.
Your documentation serves multiple purposes beyond warranty claims. It provides a historical record of equipment performance, potentially contributing to broader safety assessments and manufacturing improvements. Approach this process with the same meticulous attention to detail you would apply in a professional security or law enforcement context.
Step 4: Dispose of Defective Armor Safely
Disposing of defective body armor requires careful consideration to prevent potential misuse and ensure environmental and security protocols are followed. This step goes beyond simply discarding damaged protective equipment and demands a methodical approach that prioritizes safety and legal compliance.
Never sell or donate compromised body armor, as this could endanger lives by potentially placing faulty equipment in someone else’s hands. Learn more about responsible armor maintenance and disposal to understand the critical importance of proper handling. Professional law enforcement and security personnel must take extra precautions to prevent unauthorized access to potentially sensitive equipment.
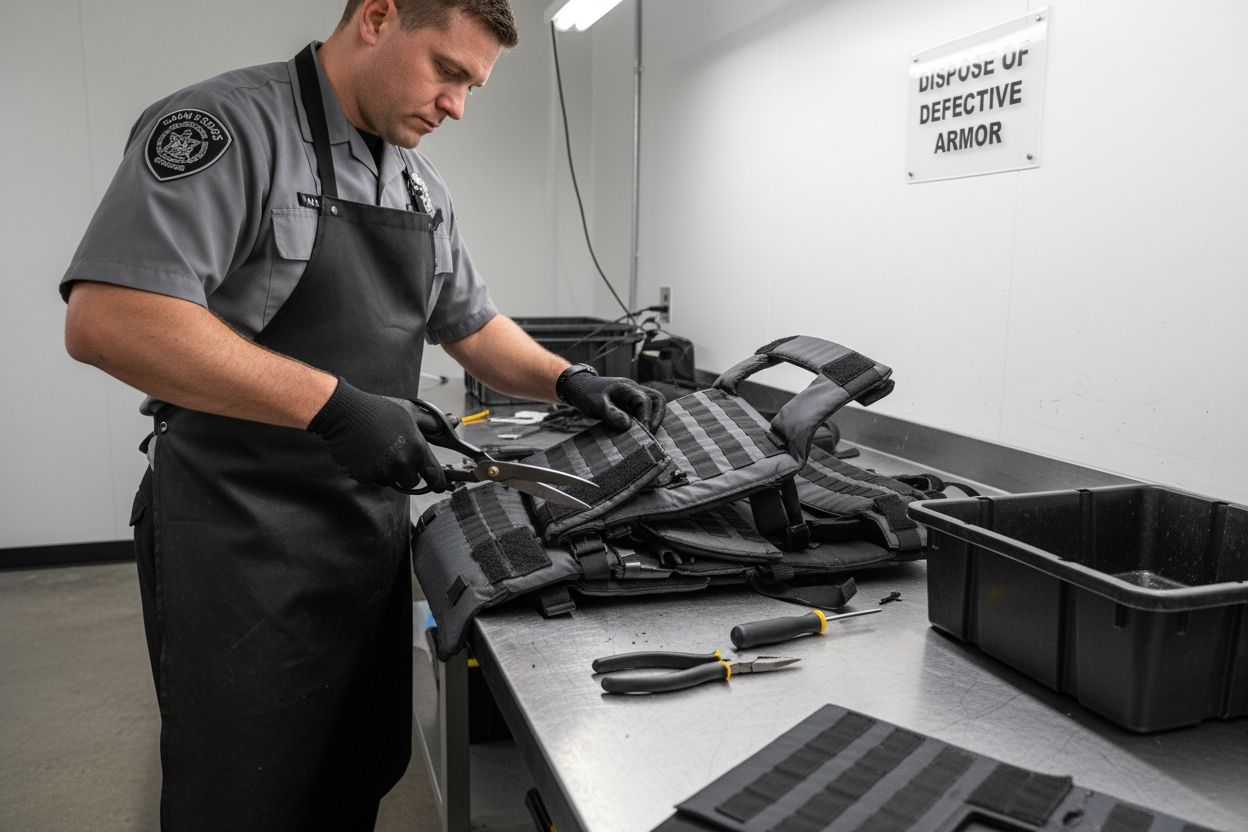
The primary objective is rendering the armor completely unusable and unrecognizable. Begin by completely destroying the structural integrity of the vest. This involves systematically cutting through critical components like ballistic panels, straps, and attachment mechanisms. Use heavy-duty industrial scissors or a utility knife to meticulously shred the material, ensuring no large, recognizable sections remain.
Key disposal considerations include:
- Completely dismantle all fabric and protective panels
- Cut through attachment points and fastening systems
- Separate different material components
- Ensure no identifiable markings remain visible
Contact local law enforcement or specialized waste management facilities that can provide guidance on secure disposal methods for tactical equipment. Some jurisdictions have specific protocols for destroying sensitive protective gear, particularly for professionals in security-related fields. Document your disposal process, keeping a record that demonstrates responsible equipment management.
Consider environmental implications when disposing of body armor. Different materials like Kevlar, ceramic plates, and synthetic fibers require distinct disposal approaches. Ceramic components might need specialized recycling, while synthetic materials could require specific industrial waste protocols. When possible, consult the original manufacturer for recommended disposal methods that align with environmental regulations.
Final verification involves confirming the armor is thoroughly destroyed, with no potential for reconstruction or misuse. Your goal is complete deconstruction that renders the equipment permanently non-functional. By following these meticulous steps, you ensure both safety and responsible equipment management, protecting potential users from compromised protective gear.
Step 5: Replace with Certified Body Armor
Replacing defective body armor requires a strategic approach that prioritizes protection, compliance, and individual safety requirements. The process goes beyond simply purchasing new equipment and demands careful consideration of specific protective needs, certification standards, and professional requirements.
National Institute of Justice (NIJ) certification is the gold standard for body armor performance. Explore our comprehensive NIJ armor plate options to understand the critical importance of selecting properly rated protective gear. When selecting replacement armor, focus on current NIJ certification levels that match your specific professional or personal protection requirements.
Carefully evaluate your protection needs based on potential threat levels, professional environment, and mobility requirements. Law enforcement officers, security professionals, and civilian users will have distinct armor requirements. Consider factors like weight, coverage area, concealability, and specific ballistic protection levels. Modern body armor offers specialized designs ranging from ultra-lightweight concealable vests to heavy-duty tactical plates.
Essential replacement selection criteria include:
- Current NIJ certification status
- Appropriate protection level for your environment
- Comfortable and adjustable fit
- Compatibility with existing tactical gear
- Manufacturer warranty and support
Consult with professional body armor specialists who can provide personalized recommendations based on your specific use case. Some manufacturers offer professional fittings and custom sizing to ensure optimal protection and comfort. Remember that body armor is a critical personal safety investment, and generic or one-size-fits-all approaches can compromise your protection. Read about widely reported real-world case where Zylon (a high-performance fiber) degraded in service and resulted in defective vests, large settlements, and government recovery actions. lt is a concrete example of defective material causing widespread failures.
Verify the new armor’s complete documentation and certification before finalizing your purchase. Request detailed specification sheets, NIJ testing reports, and manufacturer warranties. Professional-grade body armor should come with comprehensive documentation demonstrating its ballistic performance and compliance with current safety standards.
Finalize your selection by cross-referencing the new armor with your specific professional requirements and personal comfort needs. Proper body armor is not just about stopping projectiles but also ensuring you can effectively perform your duties while maintaining maximum protection.
The table below compares key criteria to consider when selecting replacement body armor. Reference this guide to ensure your new armor meets all professional and personal requirements.
| Selection Criteria | Description | Example Considerations |
|---|---|---|
| NIJ Certification | Meets current ballistic standards | Level IIIA, III, or IV certification |
| Protection Level | Matches expected threat environment | Handgun, rifle threats |
| Fit & Comfort | Proper sizing, adjustable for user comfort | Concealable, lightweight, flexible |
| Gear Compatibility | Works with existing uniforms or tactical systems | Plate carriers, uniforms |
| Warranty & Support | Manufacturer offers warranty and documentation | Written guarantee, support line |
| Documentation Provided | Includes full specs and testing reports | Certification tags, test records |
Upgrade Your Protection with Trusted Armor Solutions
You have just learned how crucial it is to assess, document, and properly replace defective body armor. If you have discovered signs of wear, structural compromise, or simply want armor that meets the latest safety standards, now is the time to take action. Relying on outdated or damaged gear leaves you exposed, and your safety deserves uncompromised quality and dependability.
At AcelinkArmor.com, every product is designed with high-stress environments in mind. We offer rigorously tested, NIJ-certified armor, including advanced Level IV plates, concealable vests, and complete tactical solutions for professionals and safety-conscious civilians. Browse our detailed product catalog to find replacements that meet strict standards for quality and durability. Don’t put off your protection. Visit AcelinkArmor.com today and secure gear you can trust for your next assignment or everyday security. Your life is too valuable to settle for anything less than the best.
Frequently Asked Questions
What signs indicate my body armor is defective?
Inspect your body armor for visible tears, discoloration, or fraying. Check for hard or soft spots and signs of moisture damage, such as mold, which could compromise its protection capabilities.
How do I document defects in my body armor for warranty claims?
Take clear, high-resolution photos of any damage and create a written report detailing the defects, purchase date, and armor specifications. Organize this documentation systematically to streamline your warranty claim process.
What should I do if I find defects in my body armor?
Contact the manufacturer immediately with detailed documentation of the issues observed. Make sure to provide the vest’s serial number and purchase information to initiate the inspection or replacement protocol.
How can I safely dispose of defective body armor?
Render the armor unusable by cutting through all critical components and ensuring no recognizable sections remain. Follow local guidelines for the disposal of tactical equipment to prevent any potential misuse.
What criteria should I follow when replacing my defective body armor?
When selecting replacement armor, prioritize options with current NIJ certification, appropriate protection levels, and a comfortable fit. Consult with armor specialists for personalized recommendations to meet your specific protective needs.
How often should I inspect my body armor for defects?
Regularly inspect your body armor, ideally every 6–12 months, and after any incident where it may have been compromised. Look for signs of wear or damage, as early detection can prevent safety risks.
Recommended
- Essential Body Armor Buying Tips for Personal Protection – Ace Link Armor
- Bulletproof Vest Care Guide – Ace Link Armor
- Understanding Thermal Comfort While Wearing Body Armor – Ace Link Armor
- Body armor heat management – Why Heat Is the Hidden Enemy – Ace Link Armor


